

Overview
I’ve been looking at implementing a proof-of-concept for the Fabric Link for Dataverse functionality to synchronise Dynamics 365 data into Fabric for use in analytics and warehousing. Previously I’ve covered Synapse Link for Dataverse which you can check out here. The official documentation for Fabric Link is available here.
My early impressions of implementing Fabric Link for Dataverse are promising, there are certainly less moving parts than implementing Synapse Link, as there’s no requirement to spin-up a Synapse workspace, storage accounts, and Spark pools if you want the data in Delta/Parquet format (which you really do want, otherwise you’re querying CSV files).
In this blog I’ll cover setting up the functionality and will go through any caveats and scenarios I tested, it’s likely I’ll have follow up blogs so please keep checking back.
Thanks to Scott Sewell who helped answer questions around compute and storage, Scott has a great series on Fabric Link for Dataverse here on YouTube.
Process Overview
The overall process is pretty simple, when setting up Fabric Link for Dataverse it does the following:
- Creates Delta and Parquet files in the Dataverse storage to sync the data and changes to, this creates a “read-replica” of the data. However this data remains in Dataverse storage
- Creates a Lakehouse in the Fabric Workspace and creates Shortcuts in the Tables section to all the source Dataverse Delta tables.
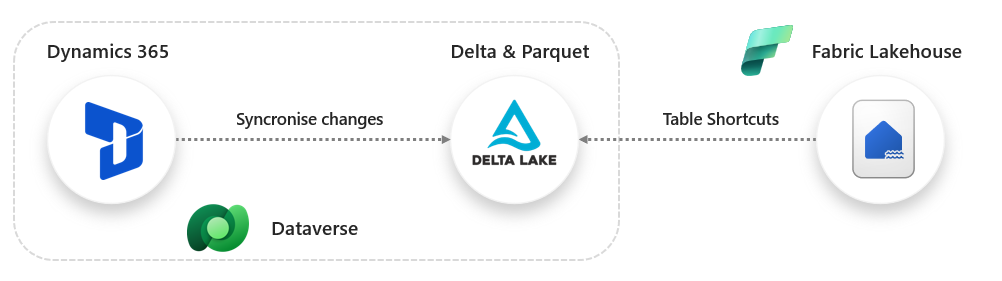
The main take-away I want to push here is Fabric Link is not actually syncing any data into Fabric OneLake, it’s creating Parquet files backed by the Delta format in the Dataverse storage itself (hence MS calling out that it adds to your storage in Dataverse in their documentation). Then in the Fabric tenant, a Lakehouse is created in a Workspace and all the Dataverse tables are made available for querying by using Shortcuts. Shortcuts allow querying and working with data external to Fabric and OneLake (e.g. Azure Data Lake Gen2, AWS S3).
Basic Architecture
Considerations
There are some considerations here for setting up and also what I found during testing.
Region-Bound Capacity
Fabric Capacity (not the tenancy) must reside in the same region that the Dataverse environment resides in. This is an exact match, so if your Dataverse environment is in UK West but your Fabric Capacity is in UK South then you cannot configure Fabric Link. However, what you can do is create a Fabric Capacity in the same region that the Dataverse environment is in, this will allow you to configure Fabric Link. In my testing I created various Azure F SKUs in different regions to test functionality.
Storage and Delta
Although shortcuts get created, what’s happening is that a replica of the Dataverse data is being created using Delta with Parquet. This then doesn’t affect the actual source Dataverse data and therefore performance of Dynamics. But what this means is that there is a lag when data is entered in Dynamics to it being available in Fabric.
Storage is also increased as well, the storage required for the Delta/Parquet creation is taken from the database capacity. In the Walkthrough later in the blog, we go through how to check your storage and capacity.
Table Selection
You cannot select specific tables in CRM, it’s “all or nothing” in terms of Fabric Link (Synapse Link allows you to select specific tables). However, Dynamics Finance and Operations allows you to select specific tables
Capacity Unit (CU) Consumption
Fabric Link itself doesn’t use Fabric Capacity (Capacity Units – CUs) for compute when syncronising the data in the Dataverse, however it will use Fabric CUs when setting up the Lakehouse and Shortcuts. You can see this in the Fabric Capacity Metrics App. I did not see any CU usage in Fabric during on-going data sync processes, I only see CU usage when I actually start to query the data using the Lakehouse/Notebook/SQL Endpoint. I’ll continue to test and analyse this.
Pausing/Resuming/Changing Capacity
I tested pausing an Azure F SKU Capacity and resumed at a later date, I could see records that were entered into Dynamics during the time the Fabric Capacity was paused. Ultimately, the storage and data itself resides within the Dataverse, the Lakehouse simply has shortcuts to the Delta tables in the Dataverse storage.
I was also able to change the capacity that was attached to the Fabric workspace.
What About Development and Testing Environments?
If you have multiple Dynamics/Dataverse environments then you can opt to either use the single capacity in your Fabric tenant or create separate Azure Fabric SKUs. The benefit of the Azure SKUs is you can pause these to save costs, I was able to pause an Azure F SKU and still amend data in Dynamics/Dataverse and when the F SKU was started, after a few minutes I could query the changed data. I also tested Fabric Link using an Azure F2 SKU and my experience matched that of using an F64/P1 SKU. Your environment may differ, so please test.
Prerequisites
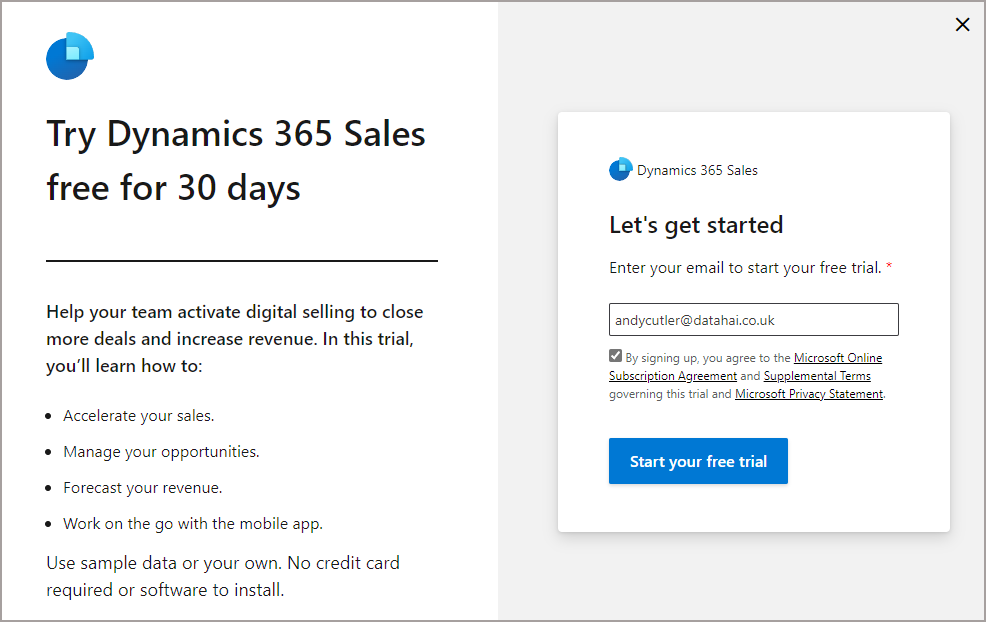
- Dynamics 365 Sales (free trial which is sufficient for this walkthrough is available, click here for details)
- Fabric/Power BI tenancy with a Fabric Capacity that resides in the same region as the Dynamics/Dataverse environments (see Region-Bound section)
- User configuring Fabric Link needs to be an environment admin in Power Apps, and also an Admin in the Workspace being used.
Setting Up Fabric Link for Dataverse
Let’s now go through the steps required to configure Fabric Link for Synapse which will include taking a quick look at Dynamics 365 Sales, configuring the link in the Power Apps portal, and seeing the results in a Fabric Lakehouse.
Dynamics 365 Sales
If you do not have a Dynamics 365 Sales environment and wish to create a proof of concept, you can sign-up for a trial here. Use your company account that is used for Office 365/Fabric/Power BI.
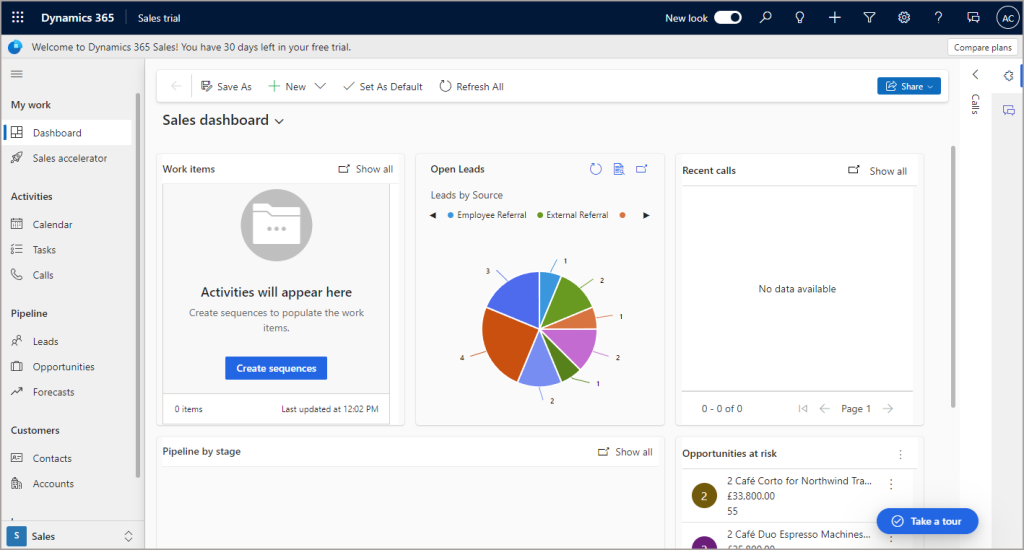
Once the trial has been initialised, you can login and see the Sales Dashboard. When we add/edit/delete data in Dynamics we’ll keep it simple and use the Contacts screen.
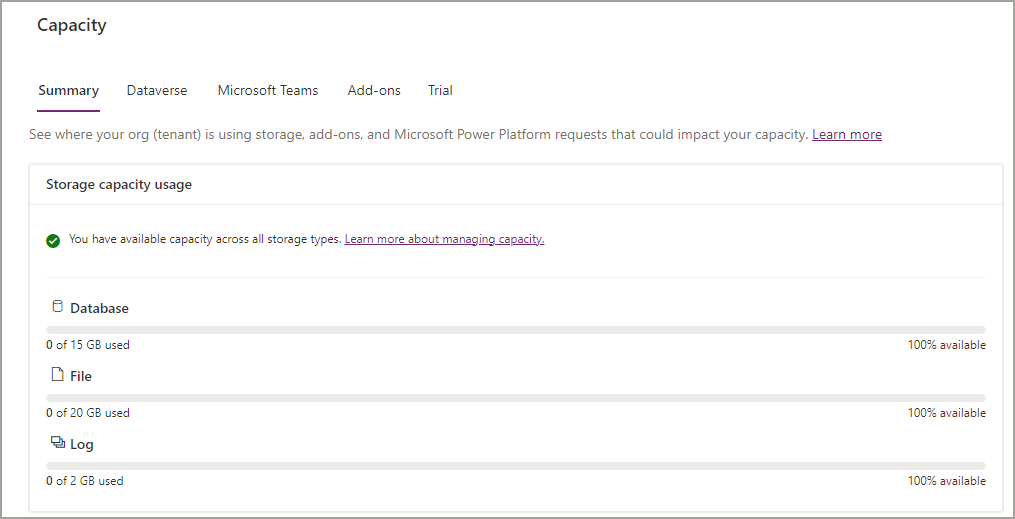
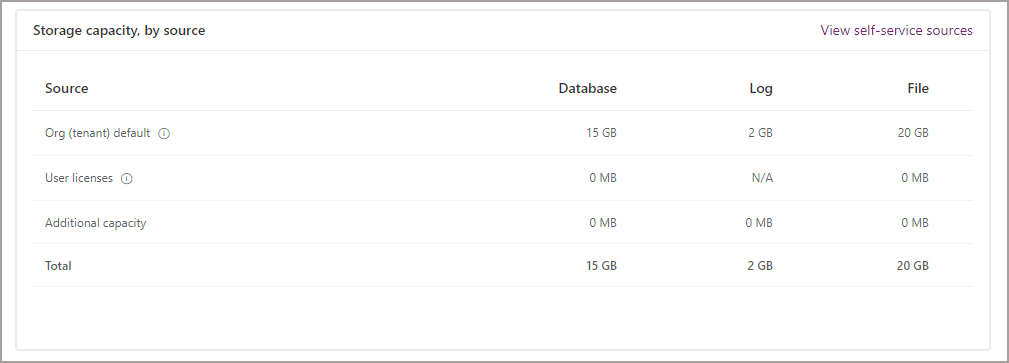
Check Dataverse Storage
To check the amount of available and used storage in the Dataverse environment, you’ll need to login to the Power Platform Admin Centre, here’s the link.
- On the main left menu click Resources > Capacity > Summary
You’ll then be able to see the Dataverse storage breakdown. The following screenshots show the Database, File, and Log capacity.
Create Fabric Workspace
- Login to Fabric/Power BI at https://app.powerbi.com
- Click Workspaces > New Workspace
- Create a new workspace and ensure the new workspace is assigned to a Fabric Capacity that resides in the same region as the Dynamics/Dataverse environment.
Setting up the Fabric Link
Once you’ve assessed the storage and available capacity, we can now go to the Power Apps portal and configure Fabric Link for Dataverse.
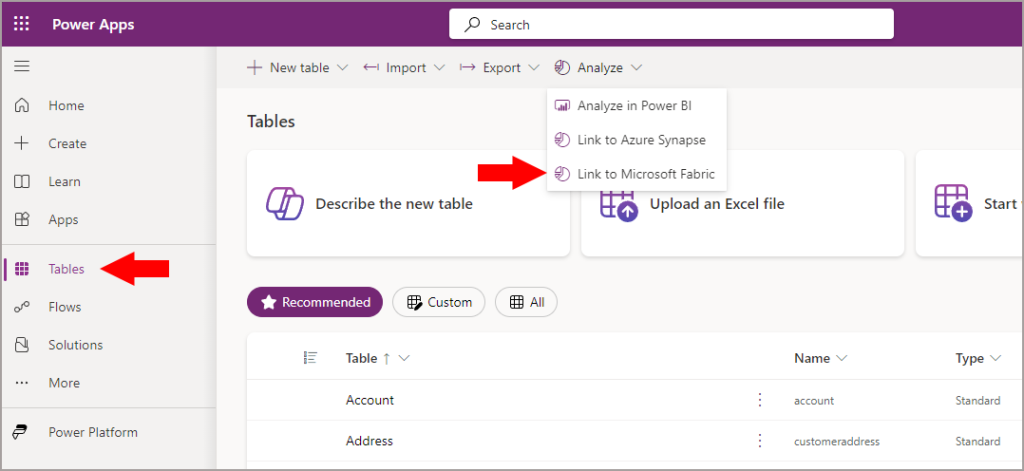
- Open the Power Apps portal https://make.powerapps.com/
- On the left menu, click Tables
- On the top menu, select Analyze > Link to Microsoft Fabric
FYI If you select specific tables in the Tables area, the Link to Microsoft Fabric option does not appear.
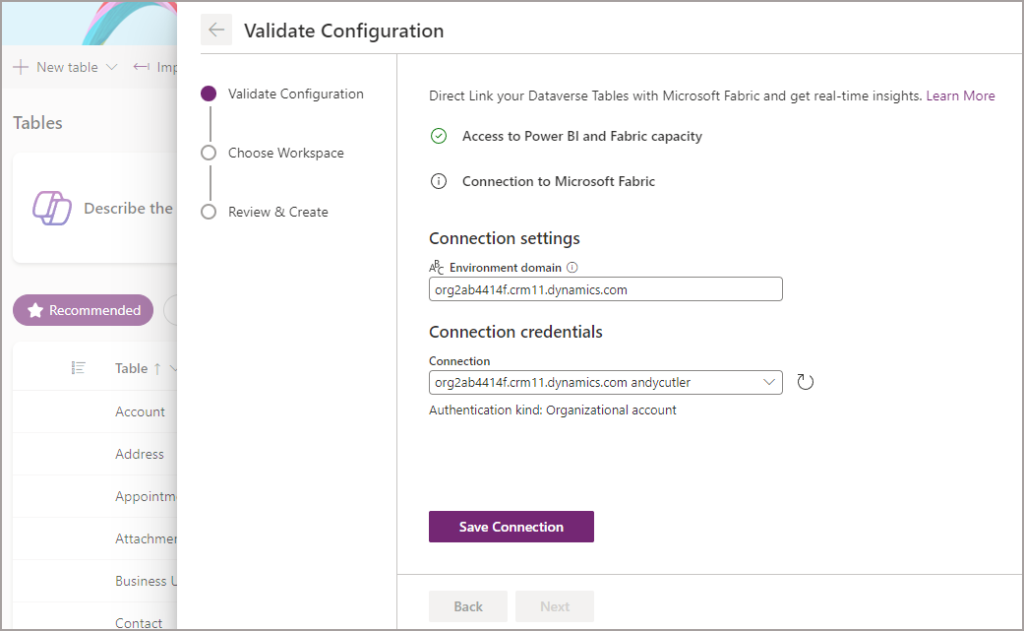
You may need to sign in to activate a connection to Fabric, if so login and then Save Connection. Note that the only authentication method is a user account, there is currently no support for Service Principal. Once the connection has been saved, click Next.
You’ll then be prompted to choose a Fabric Workspace and click Next. You’ll only be allowed to select a Workspace that meets the requirements of being attached to a Fabric Capacity in the same region as the Dataverse environment. See the Region Bound earlier section for more information.
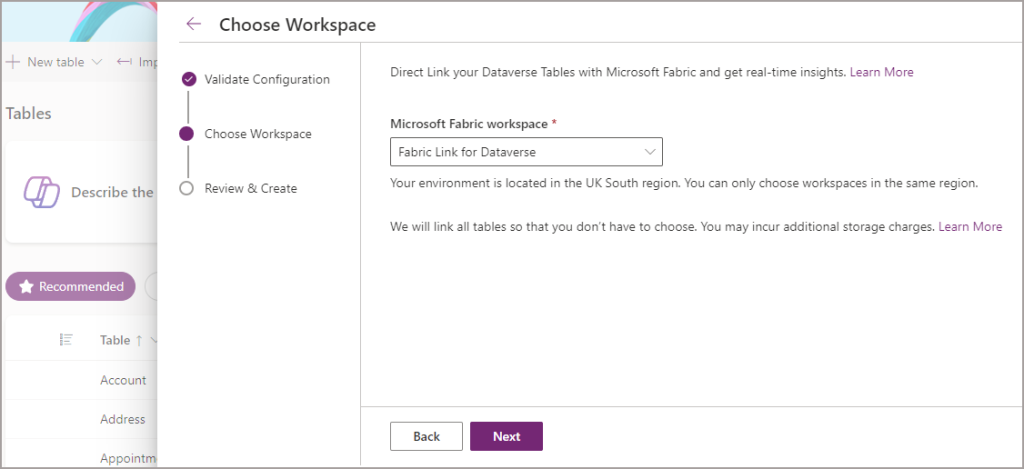
Once you’ve selected the Workspace, sit back and let the configuration wizard do its work. If any errors are generated, they’ll appear under each sub-heading action.
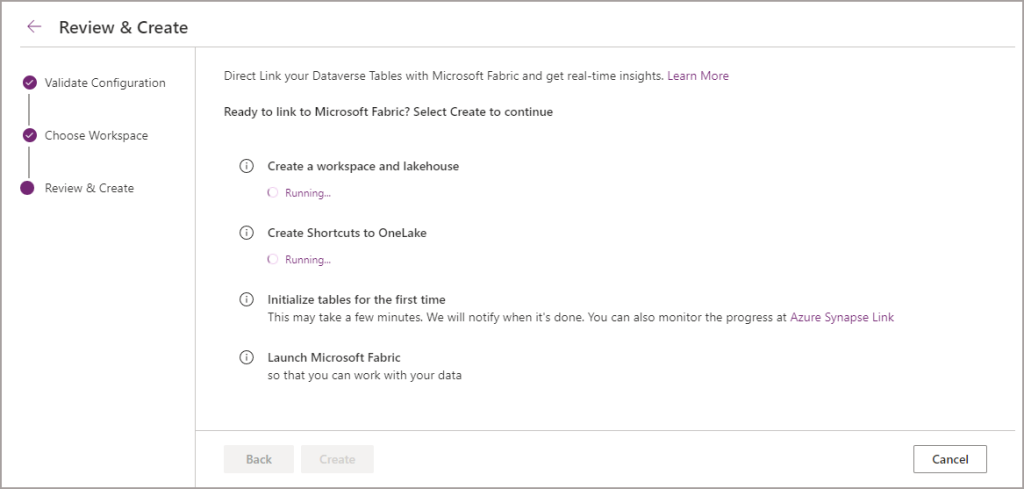
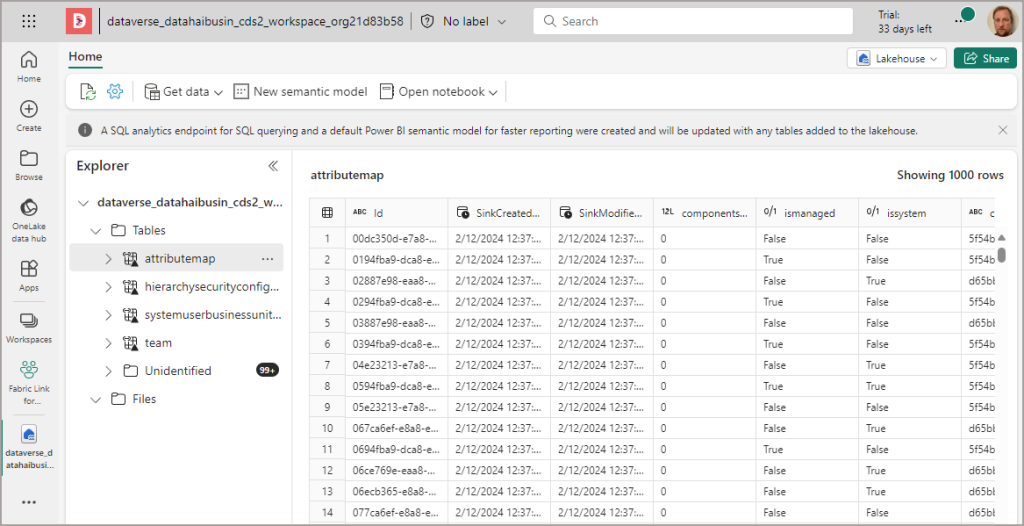
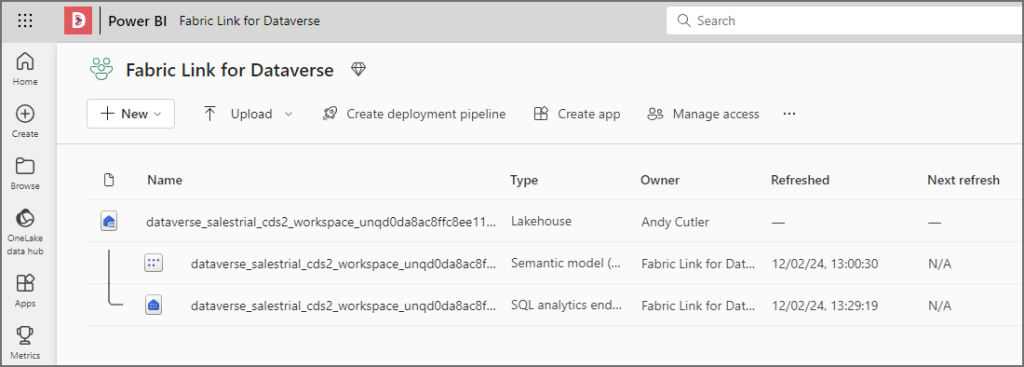
If the configuration succeeds, then you’ll be prompted to open another browser window that will take you to the Fabric Workspace and you should then see the Lakehouse, SQL Endpoint, and default Semantic Model that was created.
During my testing, it took roughly 2 hours to fully synchronise with the Lakehouse. During the sync process, you’ll see tables appearing in the Unidentified folder under the Tables section, don’t worry as the tables are being registered, it just takes “a while.”
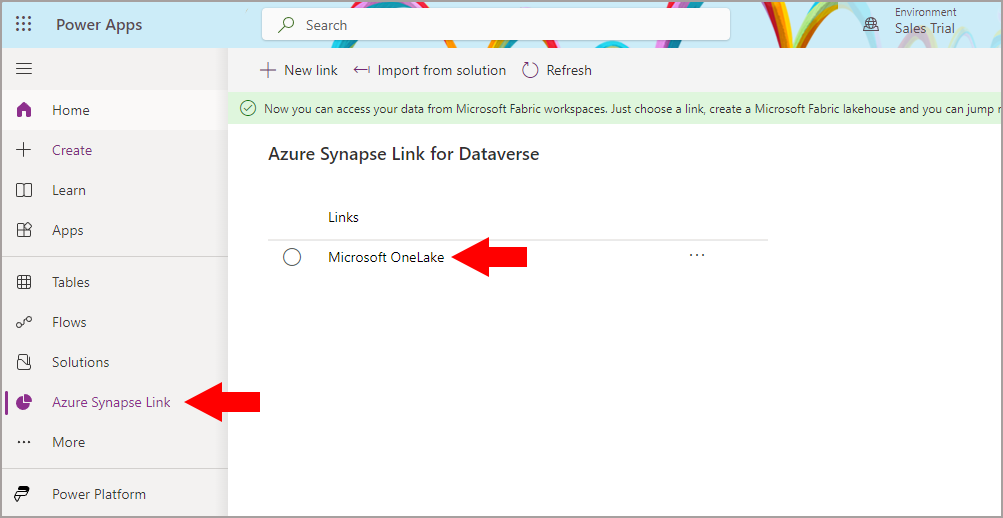
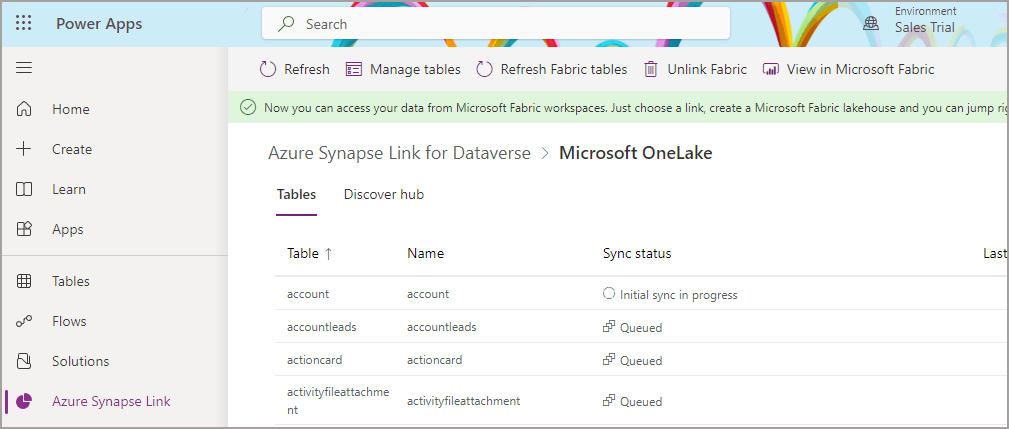
To check on the status of the Tables being syncronised in the Dataverse, go back to the Power Apps portal and this time click the Azure Synapse Link on the main left menu. You should see Microsoft OneLake in the list of Links. If you click on the link you should then see a screen with a list of tables and the sync status.
In the Tables section, you can then see the Sync Status of each table. As I mentioned earlier it takes around 2-3 hours to synchronise initially. When the sync has finished, any data changes done in the Dataverse/Dynamics environment will then be synced with a lag around a few minutes.
Now that the synchronisation process is underway, we can check back on the status of all the tables periodically. However, we can jump into the Fabric Lakehouse and start querying tables that have been registered successfully in the Lakehouse Tables section.
Querying Data using Lakehouse
Now that Fabric Link has been setup, we can open the Fabric/Power BI Workspace. We’ll see there are 3 items in the Workspace. The Lakehouse itself, plus the SQL Endpoint for running read-only SQL queries on the Lakehouse tables. And also a default Semantic Model to explore the data using Power BI.
By clicking on and opening the Lakehouse item, we can now browse the Tables section and see each of the Dataverse tables available. Again please note that you may not see all the Tables here registered and ready for querying if the initial sync is still running. If this is the case there will be tables in the Unidentified folder.
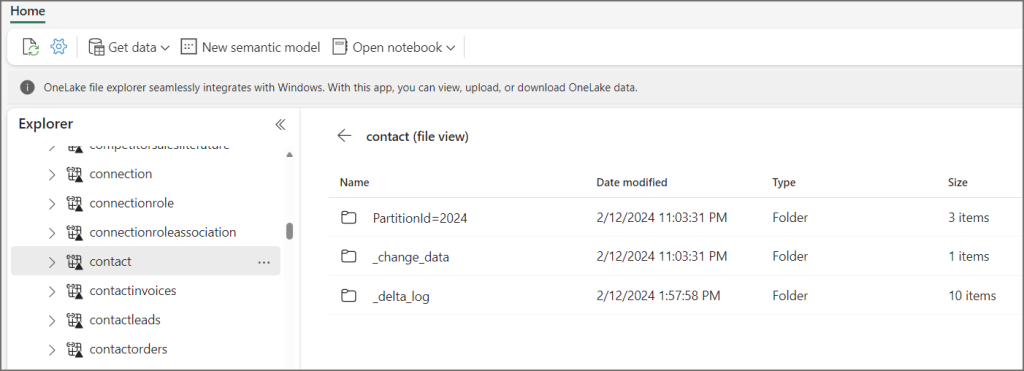
On a table, click the ellipsis and select View Files. You’ll be able to see the folders with Parquet files in and the _delta_log folder which has the transaction log in. This is not actually stored in Fabric OneLake, but is a shortcut to the folder in the Dataverse.
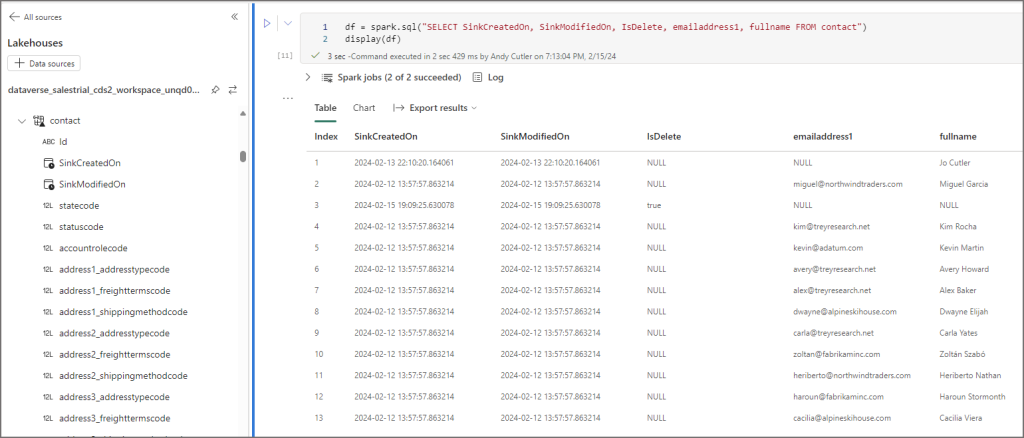
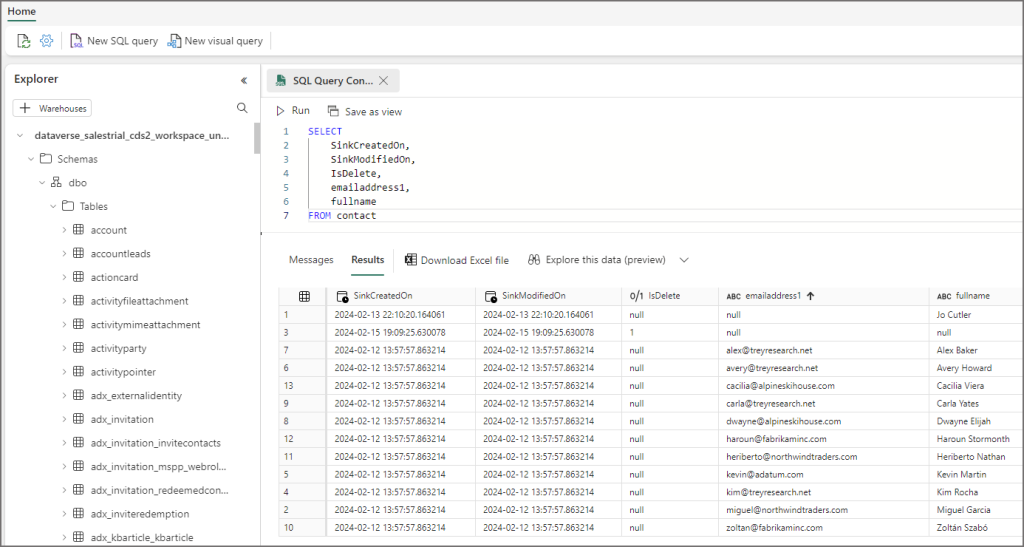
To query the data in a Fabric Notebook, select the ellipsis on a table and select Open in Notebook > New Notebook. This will then auto-generate PySpark code to select data from the table and display it. This now means we can use PySpark to read the data and do what we need in terms of downstream processing and loading, although this is read-only.
We can also use the SQL Endpoint to run SQL queries on the Lakehouse tables (just like any Fabric Lakehouse). So if your skillset is T-SQL then you’re in luck!
In another blog post we’ll take a look at useful fields in the Dataverse data and using the Semantic model.
Conclusion
In this blog post we’ve seen how to link a Dataverse environment to Fabric by using the Fabric Link for Dataverse. Overall it has less “moving parts” than setting up Synapse Link but less configuration options available. I hope in the future table selection can be done across all Dataverse tables so only syncronise what is needed. I’ll be continuing to test this feature and will keep updating thus blog with results of those test.
As always, you can get in touch here.
References
- New Microsoft Dataverse storage capacity – Power Platform | Microsoft Learn
- Capacity | Power Platform admin center (microsoft.com)
- Link your Dataverse environment to Microsoft Fabric and unlock deep insights – Power Apps | Microsoft Learn
- New Microsoft Dataverse storage capacity – Power Platform | Microsoft Learn
- Choose the Right Azure Region for You | Microsoft Azure
 Andy
Andy
Hi Andy,
Great post. Wanted to follow-up on a couple of things:
1 : Are the delta files that are produced inside of Dataverse considered database capacity or file capacity? if they’re file capacity does the log capacity play any part in this equation?
1a : do you know what they’re doing in dataverse to generate the delta files (i.e. is it basically power platform running its own spark clusters as opposed to the customer having to do it themselves?)
1b : do you know what version delta is being published (i.e. delta 2.0 vs 3.0)??
2 : Cost considerations.
2a : Is the underlying delta store for D365 in dataverse considered database/log capacity or file capacity?
2b : I understand that you get a static amounts of query capability in dataverse via power platform API – 10k per month per database included. How about querying D365 data in Dataverse? Is it using the same pool the same way when querying via fabric?
2b1 : is it different between SQL Endpoints and, say, the semantic model refresh?
I’m hoping to get to a pilot soon but thought I’d ask in case you have the information and I can prep for other things in scope of our effort there! 🙂
Do you have any reference material or published content on how customers are billed when reading the delta files in dataverse?