Harnessing Azure Synapse Analytics SQL Serverless in Power BI Dataflows
Power BI Dataflows are a Power BI Service component that allow the creation of centralised, cleansed, transformed and certified tabular data ready to be consumed by report developers in datasets and models. Dataflows reduce the need to connect to and load from the same data sources repeatedly and help reduce duplication of data cleansing and transformation logic across a Power BI estate. There are many data source connectors available in Dataflows, with the ability to connect to and load data from an Azure Data Lake Gen2 account as a native connector.
Azure Synapse Analytics SQL Serverless is a new engine available within Azure that allows data to be read from and written directly to an Azure Storage (Data lake Gen2) account using familiar SQL commands. CSV, JSON and Parquet data ingested into a Data Lake can be connected to and manipulated via the new powerful SQL Serverless engine.
In this blog post we’ll be creating a Dataflow which loads data from an Azure Data Lake Gen2 account using the Synapse Analytics SQL Serverless engine. We’ll then perform a basic loading performance comparison when using the native Data Lake Gen2 connector versus the SQL Serverless engine. Creating a Dataflow using the native Data Lake Gen2 connector is out of the scope of this blog post.
Scenario Overview
This scenario comprises several steps in which Azure and Power BI resources are created.
- Create Azure resources including Resource Group, Storage account, Synapse Analytics Workspace.
- Upload CSV files to storage account.
- Create new database and SQL objects in SQL Serverless.
- Create Dataflow using SQL Serverless.
- Create Dataflow using native Data Lake Gen2 connector.
- Test loading performance between using SQL Serverless and native Data Lake Gen2 connector.
Solution Prerequisites and Cost
A Power BI Pro account and access to an Azure subscription. There is no requirement for a Power BI Premium licence as all the steps within Power BI can be completed as a Pro licensed user. Synapse Analytics SQL Serverless pricing is based on the amount of data processed rather than on any compute tiers or uptime. The current cost is £4.6 per 1 Terabyte (TB) processed. The 3 CSV files in this solution total around 4.3 GB. During development of this blog post and subsequent Dataflow refreshes, the total cost did not exceed £1. However, keep this in mind when using your own data in this solution and budget accordingly.
Co-locating Azure and Power BI resources in the same region reduces data transfer costs, where possible select the same region when creating the Azure resources that your Power BI service is located. To find out the region that Power BI stores your data in, login to the Power BI Service (https://app.powerbi.com), select the Help and Support (question mark icon) in the top-right menu and select About Power BI. Look for the item Your data is stored in.
Walkthrough
We’ll now walk through the steps necessary to create the Azure and Power BI resources. The References section at the end of this blog post contains links to official documentation which expand on these features.
Create Azure Services
Resource Group
- Login to the Azure portal at https://portal.azure.com
- Create a new Resource Group (search for the term in the search bar) by clicking Add in the Resource Group section.
- Select the appropriate subscription to store the Resource Group in and choose a region. Please ensure that the same region is selected in all subsequent steps.
Storage Account Creation
- Create a new Storage account by clicking Add in the Storage accounts section.
- Enter the following information on the Basics tab:
- Subscription: Your appropriate subscription.
- Resource Group: Select the Resource Group created in the previous step.
- Storage account name: Enter an appropriate name such as storsynapsedemo.
- Location: Select the same region as the Resource Group
- Performance: Standard
- Account kind: StorageV2
- Replication: Zone-redundant storage
- Enter the following information on the Networking tab:
- Connectivity method: Public endpoint (all networks) – suitable for development purposes.
- Network routing: Microsoft network routing (default)
- Enter the following information on the Advanced tab:
- Blob Storage: Allow Blob public access: Disabled
- Data Lake Storage Gen2 Hierarchical Namespace: Enabled
- Select Review + Create then after successful validation, select Create.
After the new storage account has been created, we need to add a new container and folder structure.
- In the new storage account, select Containers in the Data Lake Storage section.
- Select + Container to create a new container called datalakehouse.
- Click into the new container and select + Add Directory and enter factinternetsalesbig as the name.
- Create 2 new folders called csv and parquet in the factinternetsalesbig folder.
The data itself is based on the FactInternetSales data from the AdventureWorksDW example Microsoft database. There is a single CSV (comma separated values) file and a single Parquet (compressed columnstore binary file format) file available here in GitHub. You can create multiple copies of each file and upload to the appropriate folder in the storage account. In this demo we are using 3 copies of each file however the example files on GitHub are smaller due to file size limitations. The process is the same except for the file sizes.

Synapse Analytics Workspace
- Create a new Synapse Analytics Workspace by searching for Synapse Analytics and selecting Azure Synapse Analytics (workspaces preview)
- Select Add and enter the following information on the Basics tab:
- Subscription: Your appropriate subscription.
- Resource Group: Select the Resource Group created in the previous step.
- Workspace Name: Choose an appropriate name.
- Region: Select the same region as the Resource Group.
- Select Data Lake Storage Gen2 Account Name: Select Create new and enter an appropriate name.
- File system name: Select Create new and enter users.
- Enter the following information on the Security tab
- SQL Administrator Admin username: Enter an appropriate username for the SQL administrator account.
- Password: Enter an appropriate password (and confirm).
- Enter the following information on the Networking tab:
- Disable the Allow connections from all IP Addresses checkbox
- Select Review + Create then after successful validation, select Create.
When the Synapse Analytics Workspace has been created, a Firewall rule will need to be added to ensure you can connect to the service.
- In the new Synapse Analytics Workspace section in the Azure portal, select Firewalls under the Security section.
- Ensure that Allow Azure services and resources to access this workspace is set to On.
- Enter your Client IP Address into the Start IP and End IP textboxes and give the rule an appropriate name.
Security Configuration
We’ll be using User-based security to access the storage account from SQL Serverless, therefore the user account which will be used to create the Dataflow will need appropriate permissions.
- In the Storage account created at the start of the process, select Access Control (IAM) and click Add > Add Role Assignment
- Ensure the user account is assigned to the Storage Blob Data Contributor role and save.
- The security changes can take a few minutes to activate.
SQL Serverless Database and SQL Objects
We can now create SQL objects within the SQL Serverless environment which will be used by the Dataflow.
- Browse to the Synapse Analytics Workspace in the Azure Portal.
- In the Overview section, click the link in the Workspace web URL field to open the Synapse Analytics Studio.
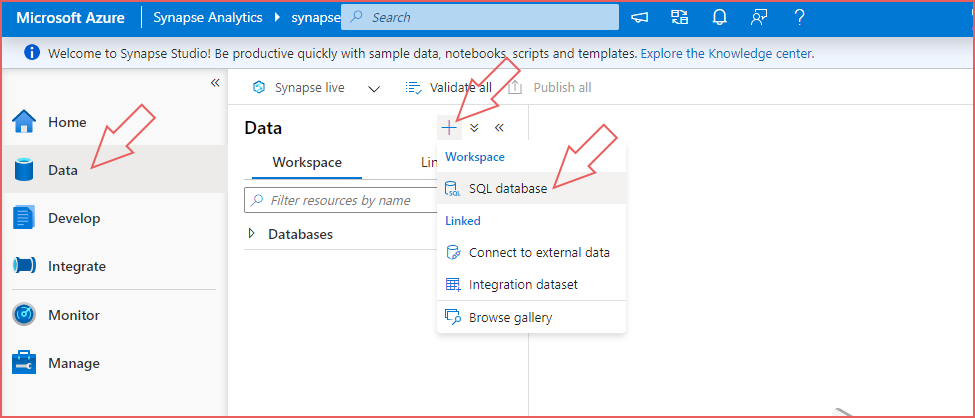
- Expand the left-hand menu and select the Data section.
- Select the + icon and select SQL database.
- Ensure that Serverless is selected in the Select SQL Pool type option and enter a name, e.g. sqldatalakehouse.
Now that a new SQL Serverless database has been created, we will create the necessary SQL objects to allow us to read (SELECT) data from the storage accounts.
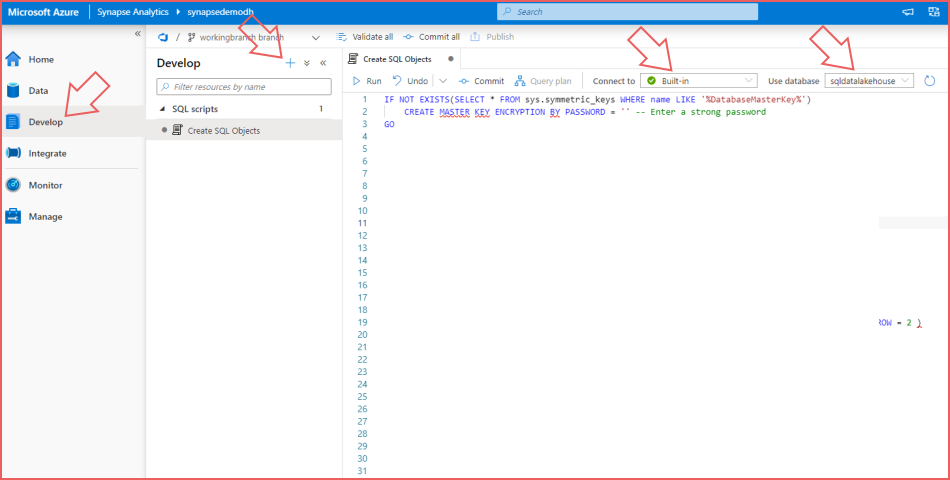
- Select the Develop section on the left-hand Synapse Studio menu.
- Select the + icon and select SQL script.
- In the Properties window to the right, give the script a name such as Create SQL Objects.
- Ensure that Connect to is set to Built-in.
- Ensure that Use database is set to sqldatalakehouse (or the name given to the new SQL Serverless database).
The following SQL code can be copied into the blank Create SQL Objects script and run individually. Alternatively you can create a new script file in Synapse Studio for each statement.
Create Database Master Key
IF NOT EXISTS(SELECT * FROM sys.symmetric_keys WHERE name LIKE '%DatabaseMasterKey%')
	CREATE MASTER KEY ENCRYPTION BY PASSWORD = '<STRONG_PASSWORD>';
Create Database Scoped Credential
IF NOT EXISTS(SELECT * FROM sys.database_credentials WHERE name = 'SynapseUserIdentity')
	CREATE DATABASE SCOPED CREDENTIAL SynapseUserIdentity WITH IDENTITY = 'User Identity'
;
Create External File Formats for CSV and Parquet
IF NOT EXISTS (SELECT * FROM sys.external_file_formats WHERE name = 'SynapseParquetFormat')
	CREATE EXTERNAL FILE FORMAT SynapseParquetFormat
	WITH ( FORMAT_TYPE = PARQUET)
;

IF NOT EXISTS (SELECT * FROM sys.external_file_formats WHERE name = 'QuotedCsvWithHeaderFormat')
    CREATE EXTERNAL FILE FORMAT QuotedCsvWithHeaderFormat
    WITH (
        FORMAT_TYPE = DELIMITEDTEXT,
        FORMAT_OPTIONS ( PARSER_VERSION = '2.0',FIELD_TERMINATOR = '|', STRING_DELIMITER = '"', FIRST_ROW = 2 )
    );
Create External Data Source
The <STORAGE_ACCOUNT_NAME> name will be the storage account name created in the Storage Account Creation section, not the Synapse Workspace section as this is where the CSV and Parquet data are stored.
IF NOT EXISTS (SELECT * FROM sys.external_data_sources WHERE name = 'storagedatalakehouse')
	CREATE EXTERNAL DATA SOURCE storagedatalakehouse
	WITH (
LOCATION   = 'https://<STORAGE_ACCOUNT_NAME>.dfs.core.windows.net/datalakehouse')
;
Create External Table for CSV and Parquet Files
The following 2 SQL scripts create External Tables which are tables that can be queried the same as regular tables but the data remains in the storage account, it is not loaded into these types if tables. SQL Serverless only supports External Tables.
CREATE EXTERNAL TABLE DW.FactInternetSalesBig (
    ProductKey INT,
    OrderDateKey INT,
    DueDateKey INT,
    ShipDateKey INT,
    CustomerKey INT,
    PromotionKey INT,
    CurrencyKey INT,
    SalesTerritoryKey INT,
    SalesOrderNumber NVARCHAR(20),
    SalesOrderLineNumber TINYINT,
    RevisionNumber TINYINT,
    OrderQuantity SMALLINT,
    UnitPrice DECIMAL(10,4),
    ExtendedAmount DECIMAL(10,4),
    UnitPriceDiscountPct FLOAT,
    DiscountAmount FLOAT,
    ProductStandardCost DECIMAL(10,4),
    TotalProductCost DECIMAL(10,4),
    SalesAmount DECIMAL(10,4),
    TaxAmt DECIMAL(10,4),
    Freight DECIMAL(10,4),
    CarrierTrackingNumber NVARCHAR(25),
    CustomerPONumber NVARCHAR(25),
    OrderDate DATETIME2(7),
    DueDate  DATETIME2(7),
    ShipDate DATETIME2(7)
) WITH (
         LOCATION = '/factinternetsalesbig/csv',
         DATA_SOURCE = storagedatalakehouse,
         FILE_FORMAT = QuotedCsvWithHeaderFormat
);
CREATE EXTERNAL TABLE DW.FactInternetSalesBigParquet (
ProductKey INT,
OrderDateKey INT,
DueDateKey INT,
ShipDateKey INT,
CustomerKey INT,
PromotionKey INT,
CurrencyKey INT,
SalesTerritoryKey INT,
SalesOrderNumber NVARCHAR(20),
SalesOrderLineNumber INT,
RevisionNumber INT,
OrderQuantity INT,
UnitPrice DECIMAL(10,4),
ExtendedAmount DECIMAL(10,4),
UnitPriceDiscountPct FLOAT,
DiscountAmount FLOAT,
ProductStandardCost DECIMAL(10,4),
TotalProductCost DECIMAL(10,4),
SalesAmount DECIMAL(10,4),
TaxAmt DECIMAL(10,4),
Freight DECIMAL(10,4),
CarrierTrackingNumber NVARCHAR(25),
CustomerPONumber NVARCHAR(25),
OrderDate DATETIME2(7),
DueDate DATETIME2(7),
ShipDate DATETIME2(7)
) WITH (
LOCATION = '/factinternetsalesbig/parquet',
DATA_SOURCE = storagedatalakehouse,
FILE_FORMAT = SynapseParquetFormat
);Run SELECT to test access
SELECT TOP 10 * FROM DW.FactInternetSalesBig;

SELECT TOP 10 * FROM DW.FactInternetSalesBigParquet;
We can now use these external tables within SQL Serverless when we define the new Dataflow.
Create a Dataflow with SQL Serverless CSV External Table
- Login to https://app.powerbi.com and create a new Workspace called Synapse SQL Serverless Dataflows
- Create a new Dataflow by selecting New > Dataflow from within the new Workspace.
- Select Add new entities.
- Search for Synapse Analytics and select the Azure Synapse Analytics (SQL DW) connection type.
- For the Server setting, enter the URL found under the Serverless SQL endpoint heading in the Overview section of the Synapse Analytics Workspace in the Azure portal. E.G. synapsedemo-ondemand.sql.azuresynapse.net.
- Enter sqldatalakehouse as the Database name (or the name given when creating the new SQL Serverless database).
- Use Microsoft account as the Authentication Kind and sign-in with your Azure Active Directory credentials. These credentials must be the same as those that were used to sign into Azure and create the resources. Select Next
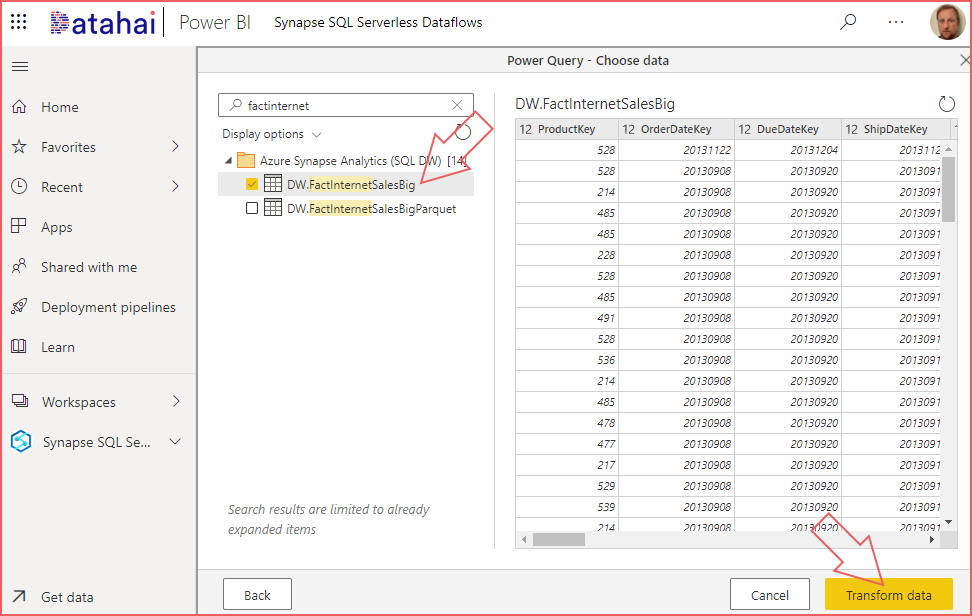
- Ensure that the DW.FactInternetSalesBig table is checked and is the only table checked. A preview of the table contents will appear in the right-hand window.
- Click Transform Data
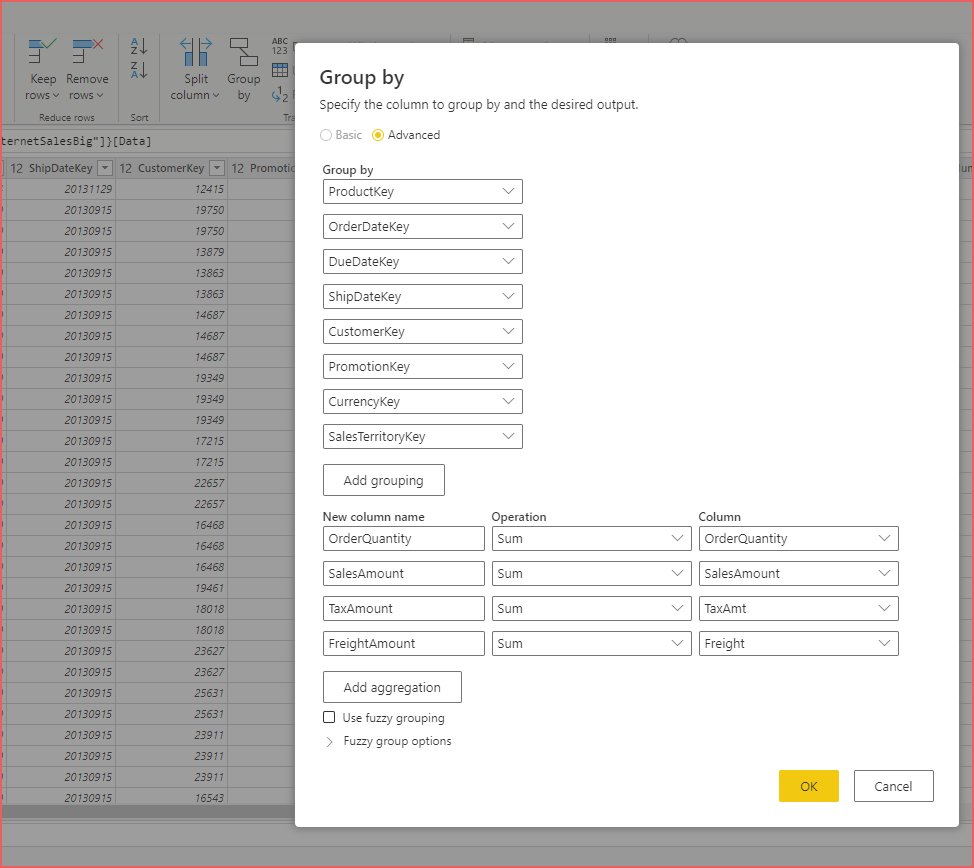
- In the Power Query editor, select the Group By transformation and select Advanced.
- Enter the following information which will aggregate the raw data and then click OK.
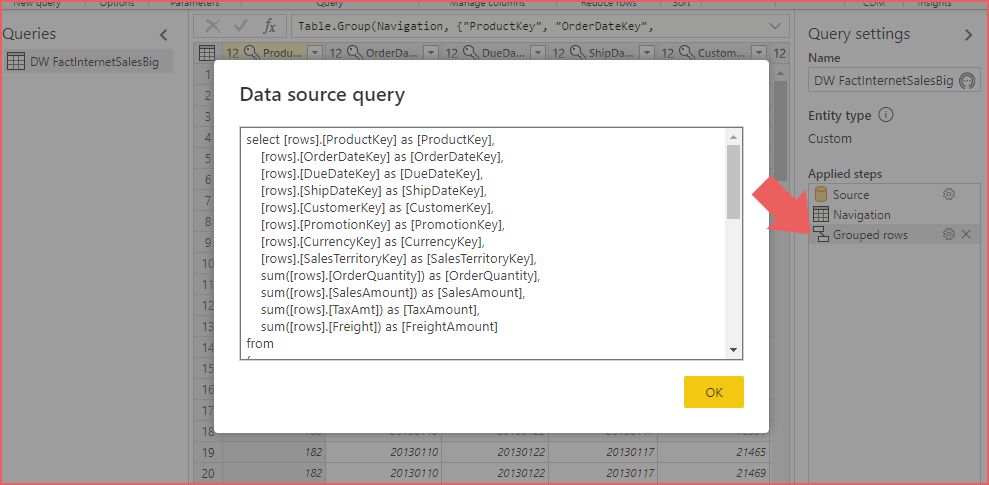
As the data source is a SQL-based system, Power Query can take advantage of Query Folding. This is the crux of the performance gains when using Dataflows with SQL Serverless as the transformation logic can be pushed down to the source system to take advantage of the source systems power. In the case of SQL Serverless, we want to take advantage of its compute power to transform the raw data.
To see the logic performed, right-click the Grouped rows step in the right-hand Applied Steps section and select View Data Source Query. This is the SQL query that will be executed on the SQL Serverless. You can also copy the query and run it via the Synapse Studio to see the results.
- Click Save & Close to finalise the Dataflow.
- Name the Dataflow Internet Sales Analysis CSV and select Refresh now when prompted.
Create a Dataflow from SQL Serverless Parquet External Table.
Follow the Create a Dataflow with SQL Serverless CSV External Table steps however select the DW.FactInternetSalesBigParquet external table when creating the Dataflow. The remaining steps are exactly as described but name the Dataflow as Internet Sales Analysis Parquet. We create 2 separate Dataflows to allow processing separately.
Performance Analysis
To view the refresh history of the Dataflow, hover over the Dataflow name, selecting the ellipsis and selecting Refresh History. The following image shows a basic performance analysis when loading from the Data Lake Gen2 account into Power BI Dataflows. These results will vary depending on your particular setup and file sizes and should be used as a basic indication.
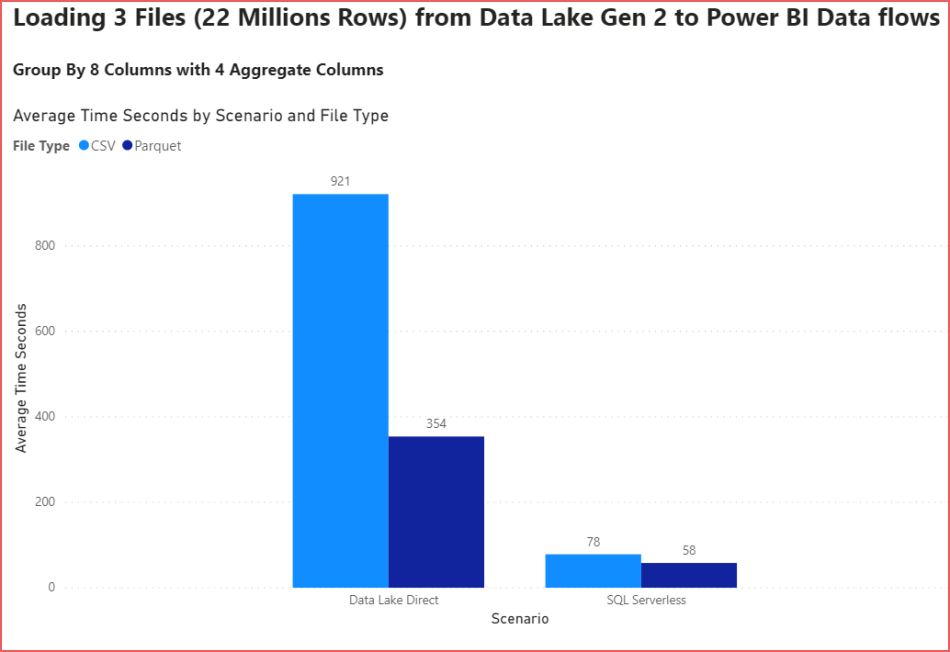
We can see that by utilising the SQL Serverless engine, the Dataflow performance time has increased significantly due to Power Query’s ability to push down (query fold) the transformation logic to the powerful SQL Serverless engine. This is across both CSV and Parquet files.
Using the native Data Lake Gen2 connector, we can see that using Parquet files does improve performance compared to CSV files but as the Power BI Dataflow engine is performing the transformation work, the performance improvements are not as great as with using SQL Serverless.
Conclusion
In this blog post we have used the new Azure Synapse Analytics SQL Serverless service to load a Power BI Dataflow with CSV files stored in a Data Lake Gen2 storage account and compared the load times with the native connector.
Considerations
- Cost & Budget – There is a costs associated with using the SQL Serverless service. The cost is based on the amount of data processed (whether it’s read from or written to the Data Lake by SQL Serverless) and is currently £4.6 per 1 Terabyte (TB). This needs to be factored in to ensure introducing this process is acceptable from a budget perspective. If a Dataflow is refreshed once per day and reads from 1TB in the Data Lake then the monthly cost will be around £120.
- System Architecture – Using SQL Serverless introduces another component in a system architecture, is this acceptable from a solution architecture perspective? A Synapse Analytics instance could be created for the sole purpose of using the SQL Serverless engine.
Clean Up
To remove the Azure resources, delete the Resource Group created at the beginning of this walkthrough. All resources within this Resource Group will be deleted.
References
- https://docs.microsoft.com/en-us/azure/synapse-analytics/quickstart-create-workspace
- https://docs.microsoft.com/en-us/azure/synapse-analytics/quickstart-sql-on-demand
- https://docs.microsoft.com/en-us/azure/synapse-analytics/sql/create-use-external-tables
- https://docs.microsoft.com/en-us/azure/synapse-analytics/sql/develop-storage-files-storage-access-control?tabs=user-identity
- https://docs.microsoft.com/en-us/power-bi/transform-model/dataflows/dataflows-introduction-self-service