

It’s recommended in a Synapse environment, especially a production/live environment, to lock a Synapse Analytics workspace down behind a Virtual Network (VNet). Synapse itself cannot be connected to any VNet, you must explicitly set an option to create the Synapse workspace in a Managed VNet, this is a VNet that (as the name suggests) Microsoft manages for you. This does take away a lot of the configuring that a VNet usually has, but it’s a little “black box” in that you can’t really do much with it.
But let’s say you’re a Developer interested in a Synapse proof of concept and want to get a loading process running with Synapse Pipelines and a Data Lake Gen2 account, and you want those Data Lake Gen2 accounts locked down from any access. Well, there’s the “full” route of using Synapse in a Managed VNet which includes:
- Creating the Synapse workspace in a Managed VNet
- Configuring no public access on the Synapse workspace
- Approving outbound connections to Azure resources (Managed Private Endpoint which we’ll cover later in this blog) such as Data Lake Gen2 accounts.
- Creating inbound Private Endpoints to Synapse endpoints such as Serverless, Dedicated, and the Studio
- Integrating the inbound Private Endpoints into DNS/VNet Gateways to allow access from developers workstations.
However, we can apply a “light” version whereby we don’t need to create Private Endpoints to Synapse endpoints and therefore need to deal with the DNS integration, VNet gateways etc. We can still test Synapse with a secure Data lake Gen2 account, in-fact any resources that support a private endpoint connection e.g. Azure SQL Database.
Just to clarify Private Endpoint terminology, within Synapse, there are 2 types:
- Private Endpoint: Allow an inbound connection to Synapse endpoints such as Serverless SQL Pools, Dedicated SQL Pools, the Studio Development environment
- Managed Private Endpoints: Allows outbound connections from a Synapse workspace to a resource that is locked down from public access and supports private endpoints
Prerequisites
I won’t go into detail about how to create a Synapse workspace or Data Lake Gen2 account, please see the Getting Started with Serverless SQL Pools for a walkthrough.
Costs
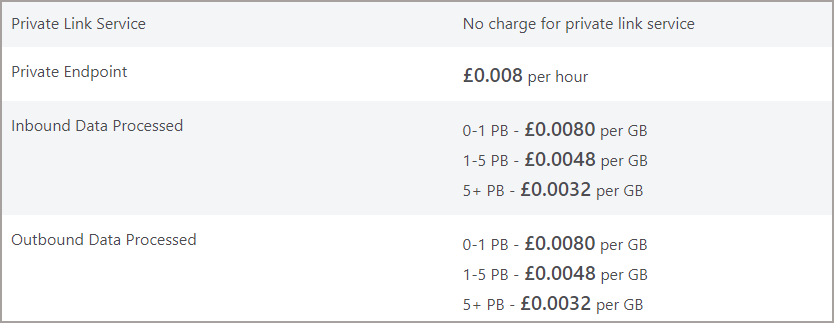
Be warned that there are costs associated with running a Synapse environment in a Managed VNet. E.G. Pipelines will use the Azure Hosted Managed VNET Price pricing:

There’s also the cost of the Managed Private Endpoints from Synapse to other data resources too. Each Private Endpoint in this example will cost ~£6 per month.
Synapse Workspace Managed VNet
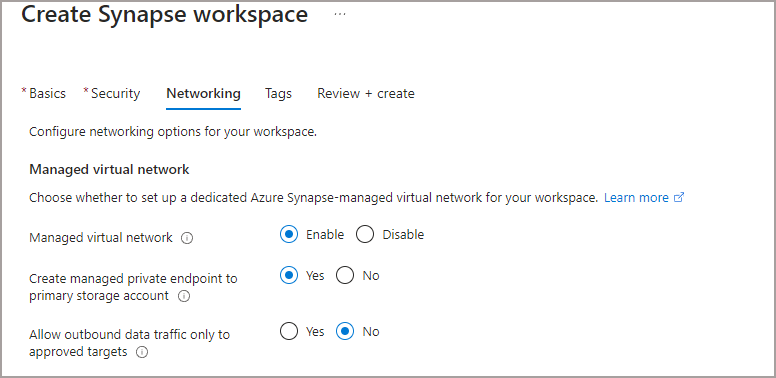
When creating a Synapse workspace you are prompted on the Networking tab to either enable or disable a Managed Virtual Network. Once you have chosen an option, you are not able to change this option once the Synapse workspace has been created.
In the image below, there are 3 options we can select, note that only the 2nd and 3rd options are available if you enable the Managed VNet.
- Managed virtual network: enables/disables a Managed Vnet of the workspace
- Create managed private endpoint to primary storage account: This option will create a managed private endpoint from the Synapse workspace to the primary storage account associated with the workspace, I’d recommend setting this to Yes.
- Allow outbound data traffic only to approved targets: This locks down the outbound access from the Synapse workspace to certain tenants and will use managed private endpoints for connections. If you need to connect to services outside of Azure then you would need to create a Self-Hosted Integration Runtime (out of scope here).
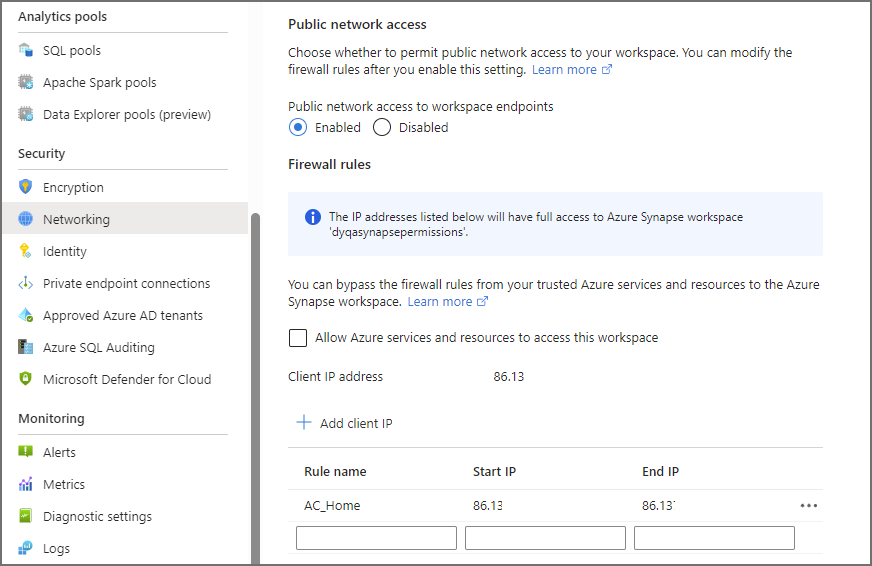
The Public network access option (image below) on the Networking tab is the crux of our “light” version of implementing a Managed VNet as we’ll be setting this to Enable. Access to the Synapse endpoints will be done by IP whitelisting. We are free to change this option once the workspace has been created.

Once the Synapse workspace has been created, we can browse the Networking tab and see this option, plus the option to Allow Azure services and resources to access this workspace. We can leave this as disabled, it won’t affect our ability to login to Synapse studio and work with Synapse.
Creating and Connecting to a Data Lake Gen2 Account
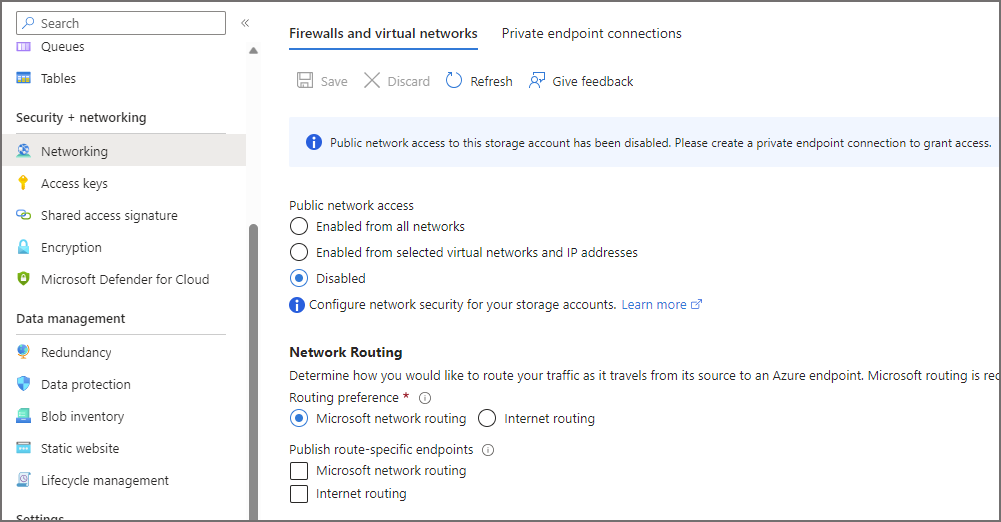
What we can do now is create an ADLS Gen2 account with no public access and create a Managed Private Endpoint to it from the Synapse workspace. Once the ADLS Gen2 account has been created, if you browse to the Networking tab and ensure that the Public network access is set to Disabled.
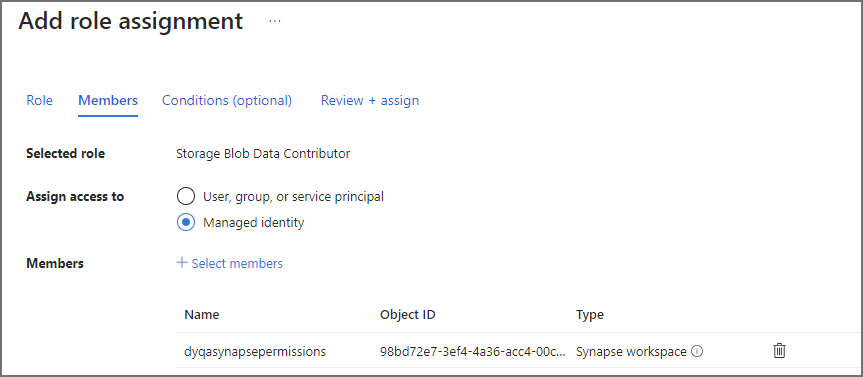
On the Access Control (IAM) let’s add the Storage Blob Data Contributor role to the Synapse workspace.
- Click on Access Control (IAM)
- Click Add > Add Role Assignment
- Search for and select Storage Blob Data Contributor
- Select Next and select Managed Identity
- Click Select Members and search for the Managed identify of the relevant Synapse workspace.
- Click Review + assign
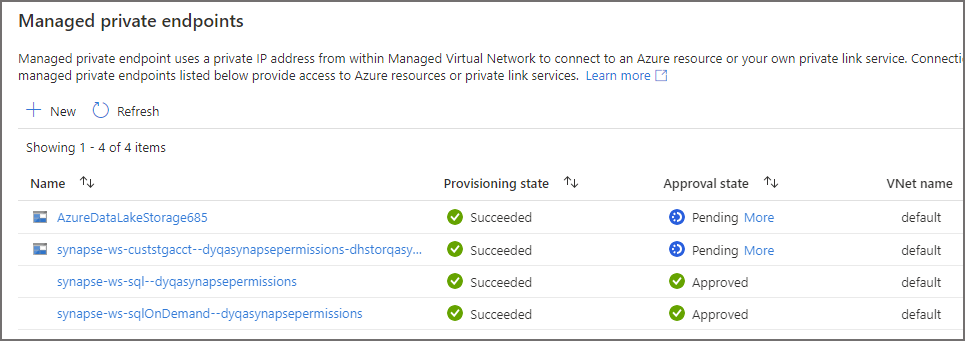
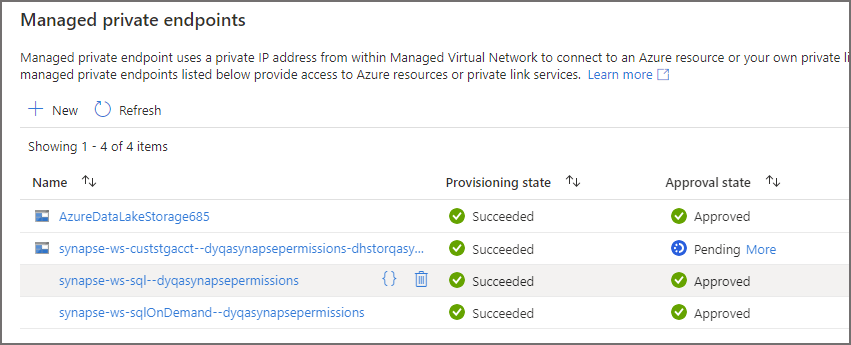
Now let’s open the Synapse workspace and create a Managed Private Endpoint to this ADLS Gen2 account.
- Open the Synapse workspace https://web.azuresynapse.net
- Click Manage > Managed Private Endpoints
- Click New and search for Azure Data Lake Storage Gen2
- Select the relevant Subscription and storage account
- Click Create
Wait until the Provisioning state shows as Succeeded and the Approval state is Pending.
Let’s now head over back to the Networking tab on the ADLS Gen2 account and click on the Private Endpoints Connections. Select the relevant Private Endpoint connection and click Approve.
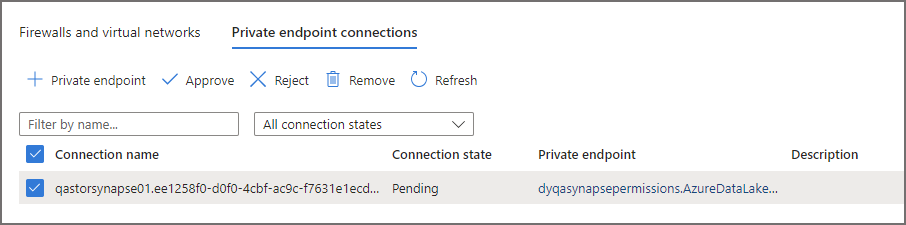
If we flip back to the Synapse workspace we should now see the Managed Private Endpoint is in the Approved state and ready for a Linked Service to be created for use in a Synapse Pipeline.
Creating a Linked Service
To create a Linked Service to the Data Lake Gen2 account:
- Login to Synapse Studio and click Manage on the main left-hand menu
- Under External Connections, click Linked Services
- Click New and search for and select Azure Data Lake Storage Gen2
- Use the System Assigned Managed Identity as the Authentication type
- You should see that the Managed Private Endpoint is already populated and the status is Approved.
- Create Create.
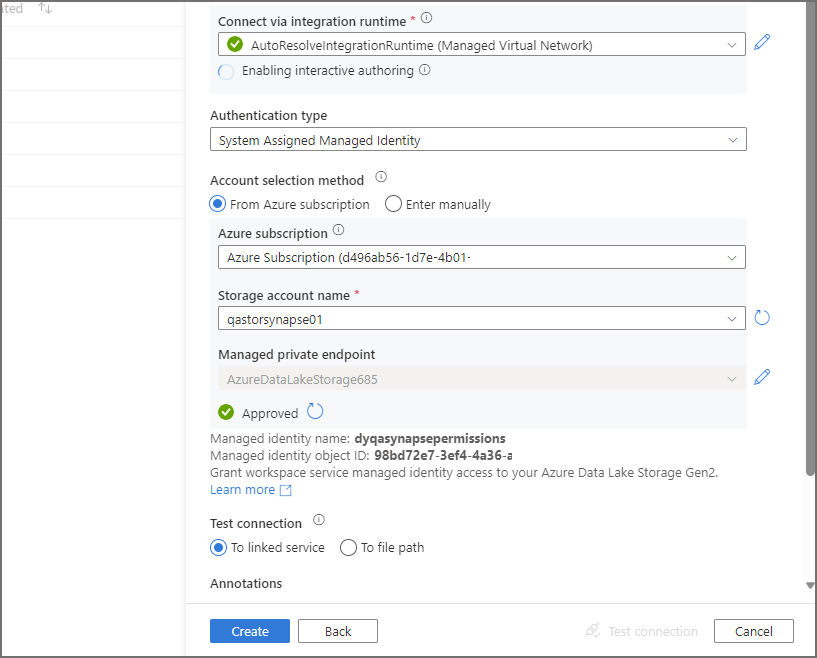
We can now use this Linked Service in Synapse Pipelines when reading and writing data to that storage account.
Conclusion
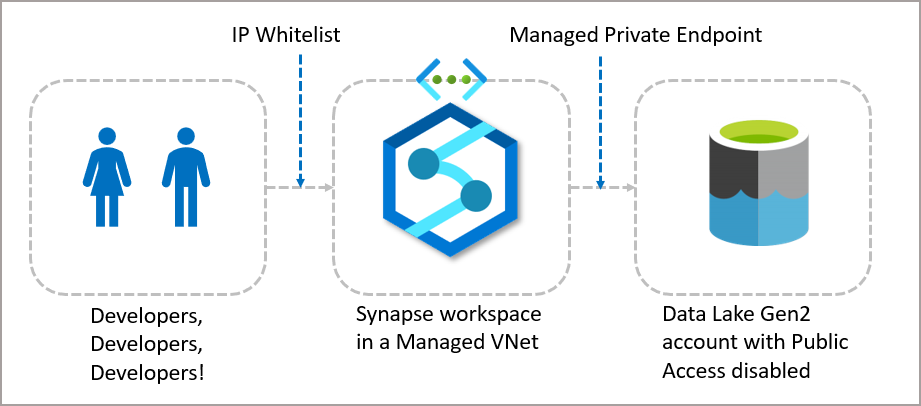
Although there are a few more steps in configuring Synapse Analytics to use a Managed VNet, it’s well worth being able to test the functionality in a proof-of-concept without having to implement all the private endpoints and DNS configurations that are required. We can create an Azure Data Lake Gen2 storage account and lock it down from public access, then test Synapse connectivity via Managed Private Endpoints, whilst using an IP whitelist to access the Synapse workspace.
As always feel free to reach out and continue the discussion.
 Andy
Andy
Disabling the public access on my storage account seems to then block any visibility through the data section in synapse.
However, pipelines that use the linked service against that storage acc still run….
Hi Andrew, yes that’ll happen via both the Data section in Synapse and also if you try and browse the storage account in the portal. You would need a firewall rule applied to the storage account to let your IP address in.